Installing TC‑Toolbox with the Custom Option
MATLAB® must be installed before you install TC‑Toolbox.
As described in Installing TC‑Toolbox, if MATLAB® is already installed, then Thermo-Calc automatically installs the files you need either using the Full Standalone or Full Network Client installation where you install all features. Otherwise you need to use the Custom installation.
The following generally describes the Custom option for either a Standalone or Network installation. Use the Custom option if MATLAB® is installed but the Thermo-Calc installer is not finding the directory path so you need to enter the path manually.
Some steps are described in more detail in other parts of this guide.
Step 1. Request your License File from Thermo‑Calc Software
A reminder regarding the license. Although you do not need to have a license file during the installation process (it can be added after the fact), you do need to have purchased a license for TC-Toolbox for MATLAB® to run the program within MATLAB®.
Step 2. Download your Thermo‑Calc Installation Software
Step 3. Install MATLAB®
Step 4. Run the Thermo-Calc Installation File as an Administrator
- Locate the Thermo-Calc installation file on your computer. Right-click the .exe file and choose Run as administrator to launch the Setup program.
- Accept the License Agreement and click Next.
Step 5. Select the Custom Installation Type
- On the Specify Configuration window the Create Shortcut on Desktop checkbox is selected by default. Click Next.
-
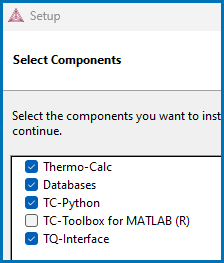
In the Select Components window, click to select the TC-Toolbox for MATLAB checkbox.
Remember, you must have MATLAB® already installed and may need to know the file path to the MATLAB® folder. If the TC-Toolbox for MATLAB checkbox is NOT selected, this confirms that the Thermo-Calc installer did NOT locate the MATLAB® installation (or it is not installed yet).
- Click Next.
-
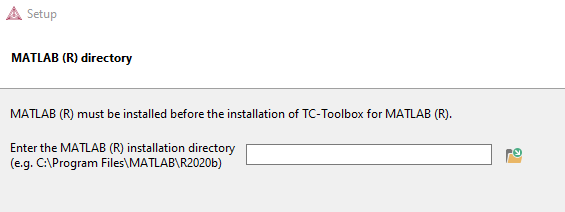
If you selected the TC-Toolbox for MATLAB checkbox, the MATLAB directory window opens.
- If MATLAB® is already installed but the Thermo-Calc installer could not find the path, then enter the file path to the MATLAB® installation directory or click the file button
 to Browse for Folder and navigate to the directory. Click Next.
 - If MATLAB® is NOT installed, click Cancel to exit the Thermo-Calc installer program. Once MATLAB® is installed you can return to this process.
- If MATLAB® is already installed but the Thermo-Calc installer could not find the path, then enter the file path to the MATLAB® installation directory or click the file button
Step 6. Set the Thermo-Calc Installation Directory and Choose the Setup Type
-
In the Installation Directory window, either accept the default path or enter a path to where you want to install the Thermo-Calc software. Click the file button
 to Browse for Folder and navigate to another directory.
 -
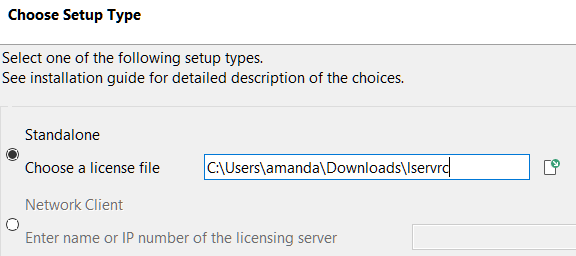
In the Choose Setup Type window, click Standalone or Network Client.
-
For a Standalone installation: In the Choose a license file field enter the path to your license file (called lservrc).
-
For a Network installation: Enter the details as required into the Enter the name or IP number of the licensing server field. Click Next.
If the TC-Python checkbox is also selected to be installed (which it is by default), the Install TC-Python window is a reminder that additional installation procedures are required after Thermo‑Calc is installed.
-
Step 7. Install and Start Using Thermo‑Calc as an Add-on in MATLAB®
-
In the Ready to Install window click Next.
If MATLAB® is not installed (and you selected the TC‑Toolbox checkbox) a message displays to confirm that TC-Toolbox will not be installed until you complete the MATLAB® installation. If MATLAB is installed, click Back to confirm that the installation path is correct, otherwise Cancel this Thermo-Calc installation, install MATLAB and start again.
- Click Finish.


