Custom Network Client Installations
This section is applicable to installations involving a license file activation type. This licensing method is gradually being replaced by the user credentials activation type starting with Thermo‑Calc 2025a.
This installation type is available for all operating systems, however for macOS the License Server must be run on a Windows or Linux computer.The requirements are the same as for a full client installation.
Step 1. Install the Licensing Software
Follow the instructions for your operating system:
Step 2. Complete Steps 1 to 4 of a Full Standalone Installation
Follow the instructions for Full Standalone Installations to download and run the software. It is up to you whether you get the computer information for the license files before or after installing the software.
Step 3. Select the Installation Mode and the Components to Include or Exclude
About the Thermo‑Calc Installed Components
-
In the Select License and Installation Mode window click Custom. Click Next.

- On the Specify Configuration window the Create Shortcut on Desktop checkbox is selected by default. Click Next.
- In the Select Components window, click to select or deselect the checkboxes as needed. Click Next.

Step 4. Set the Installation Directory and the File Path to the License
- In the Installation Directory window, either accept the default path or enter a path to where you want to install the software (see Installation Default Directories and the License File). Click the file button
 to Browse for Folder and navigate to another directory. Click Next.
To prevent errors, leave this field blank if you do not have a license file yet.
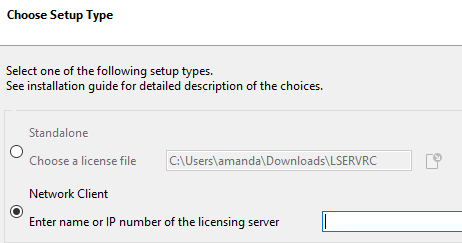
- In the Choose Setup Type window, click Network Client and enter the name or IP number of the computer where the licensing software is installed. Click Next.
If you have selected to install TC-Python there is a reminder window that additional installation procedures are required after Thermo‑Calc is installed. See the TC-Python Installation Guide.
Step 5. Install the Software and Start Using Thermo‑Calc
-
In the Ready to Install window click Next.
See the separate instructions for TC-Toolbox for MATLAB®.
- Click Finish and start using Thermo‑Calc. For Linux users, log out and log back in to finish the installation.
For macOS installations and if you have previous Thermo‑Calc installations: When you launch Thermo‑Calc with the new or updated version, the splash screen hides the Import User Settings dialog box. In order to proceed you need to click the splash screen and then click Yes or No in the dialog box.
If you did not get your license file see Request a License File from Thermo‑Calc Software.